
In this post, I will guide you through building a simple distributed Phoenix application.
This tutorial is designed for developers with basic Elixir and Phoenix knowledge who want to take their first steps into the world of distributed systems. This project will include a couple of simple features:
- A simple LiveView page
- with a button to broadcast a message
- and a subscription to these broadcasted messages
- Distribution across multiple nodes
Using Phoenix PubSub we will broadcast to the topic the LiveView page is subscribed to. When the subscribers receive a message they will append this message to a list on the screen. Here is a little sneak peek at what you'll end up with:
Let's get started!
0. Prerequisites
Make sure you have installed:
1. Creating the project
To create the project, run:
mix phx.new clump --no-ecto --no-mailer
The --no-ecto flag makes sure that the project won't include the Ecto database ORM. The --no-mailer flag excludes the Swoosh email library.
2. Project configuration
Before we really get started, let's make the port the application runs on configurable, we'll need that when we start running the application on multiple nodes.
Make the following changes to config/dev.exs:
# config/dev.exs

port = String.to_integer(System.get_env("PORT") || "4000")

config :clump, ClumpWeb.Endpoint,
  http: [ip: {127, 0, 0, 1}, port: port],
  # ...
We use port 4000 unless specified otherwise through the PORT environment variable.
3. Adding the LiveView page
Now that the project has been created and configured we can start adding functionality.
To send and display the message in the browser, we'll add a LiveView page. Make the following changes to your project to add one:
# lib/clump_web/live/echo_live.ex

defmodule ClumpWeb.EchoLive do
  use ClumpWeb, :live_view

  @impl true
  def render(assigns) do
    ~H"""
    <h1 class="text-3xl">Node: <%= node() %></h1>

    <br />

    <h2 class="text-xl">Message to send:</h2>
    <div class="flex items-center space-x-4">
      <input
        type="text"
        phx-keyup="update_input"
        value={@input_value}
        class="rounded-md"
        placeholder="Enter your message here"
      />
      <button phx-click="send_message" class="px-4 py-2 bg-blue-500 text-white rounded-md">
        Send message
      </button>
    </div>

    <br />

    <h2 class="text-xl">Messages:</h2>
    <ul class="list-disc list-inside">
      <%= for message <- @messages do %>
        <li><%= message %></li>
      <% end %>
    </ul>
    """
  end

  @impl true
  def mount(_params, _session, socket) do
    ClumpWeb.Endpoint.subscribe("messages")

    socket =
      socket
      |> assign(:messages, [])
      |> assign(:input_value, "")

    {:ok, socket}
  end

  @impl true
  def handle_event("update_input", %{"value" => value}, socket) do
    {:noreply, assign(socket, input_value: value)}
  end

  @impl true
  def handle_event("send_message", _params, socket) do
    message = socket.assigns.input_value
    ClumpWeb.Endpoint.broadcast_from!(self(), "messages", "echo", {:message, message})
    socket = socket |> assign_message(message)
    {:noreply, socket}
  end

  @impl true
  def handle_info(
        %Phoenix.Socket.Broadcast{
          topic: "messages",
          event: "echo",
          payload: {:message, message}
        },
        socket
      ) do
    socket = socket |> assign_message("Received: #{message}")
    {:noreply, socket}
  end

  defp assign_message(socket, message) do
    socket
    |> assign(:messages, [message | socket.assigns.messages])
  end
end
This page needs to be added to the router:
# lib/clump_web/router.ex

scope "/", ClumpWeb do
  pipe_through :browser

  get "/", PageController, :home
  live "/echo", EchoLive # add this line
end
Let's examine this code, function by function.
render/1
This function renders the HEEx template. We define a heading with the name of our node, an input field and a button to send messages, and a list of messages.
mount/3
This function gets called when the LiveView page gets first loaded. We subscribe to the "messages" topic and assign an empty :messages list and :input_value string.
handle_event("update_input", ..., ...)
This function gets called every time the input field gets updated. We use it to set the :input_value value in the socket, which we'll need to broadcast the message.
handle_event("send_message", ..., ...)
This function is triggered when the "Send message" button is clicked. It performs three main actions:
- Retrieves the current input value from the socket.
- Broadcasts this message to all other subscribers of the
"messages"topic. - Adds the sent message to the local list of messages.
We use broadcast_from! instead of broadcast! to avoid receiving our own message. The self() argument ensures the message is sent to everyone except the sender.
handle_info(%Phoenix.Socket.Broadcast{}, ..., ...)
This function handles incoming messages from the "messages" topic. It is triggered for each message broadcast by other nodes, thanks to our subscription in the mount function.
When a message is received, we:
- Prepend "Received: " to the message text.
- Add this modified message to our local list of messages.
This prepending helps distinguish between messages we've sent and those we've received from other nodes.
4. Testing the LiveView page
Let's see if everything is wired up correctly.
Start the Phoenix server using mix phx.server and navigate to localhost:4000/echo. Type your message in the input field and click the button.
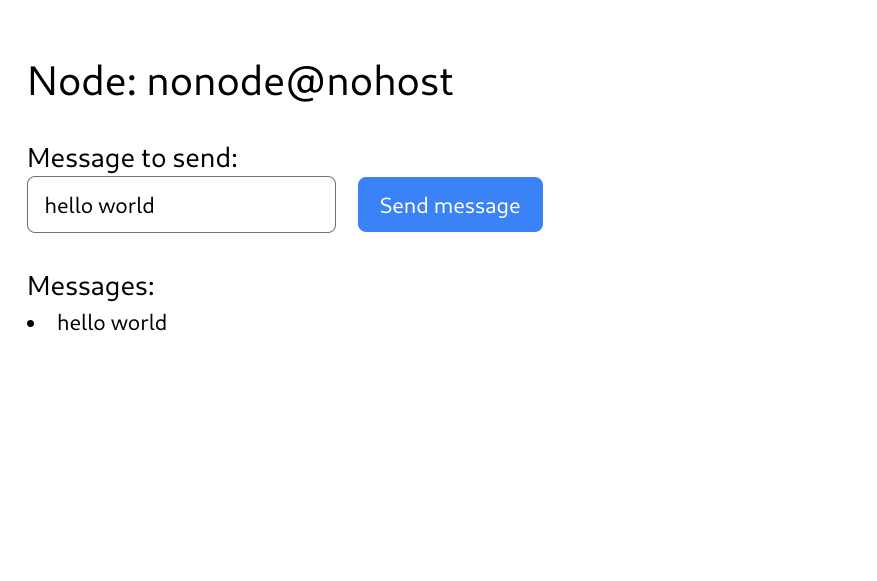
You should see your message added to the list!
5. Making it distributed
Before doing distributed Elixir, let's do normal Elixir.
Run two instances of the server, each on its own port:
$ PORT=4000 elixir --name node1@127.0.0.1 -S mix phx.server
$ PORT=4001 elixir --name node2@127.0.0.1 -S mix phx.server
Then, go to both localhost:4000/echo and localhost:4001/echo in your browser. Type a message in either input field and click the button.
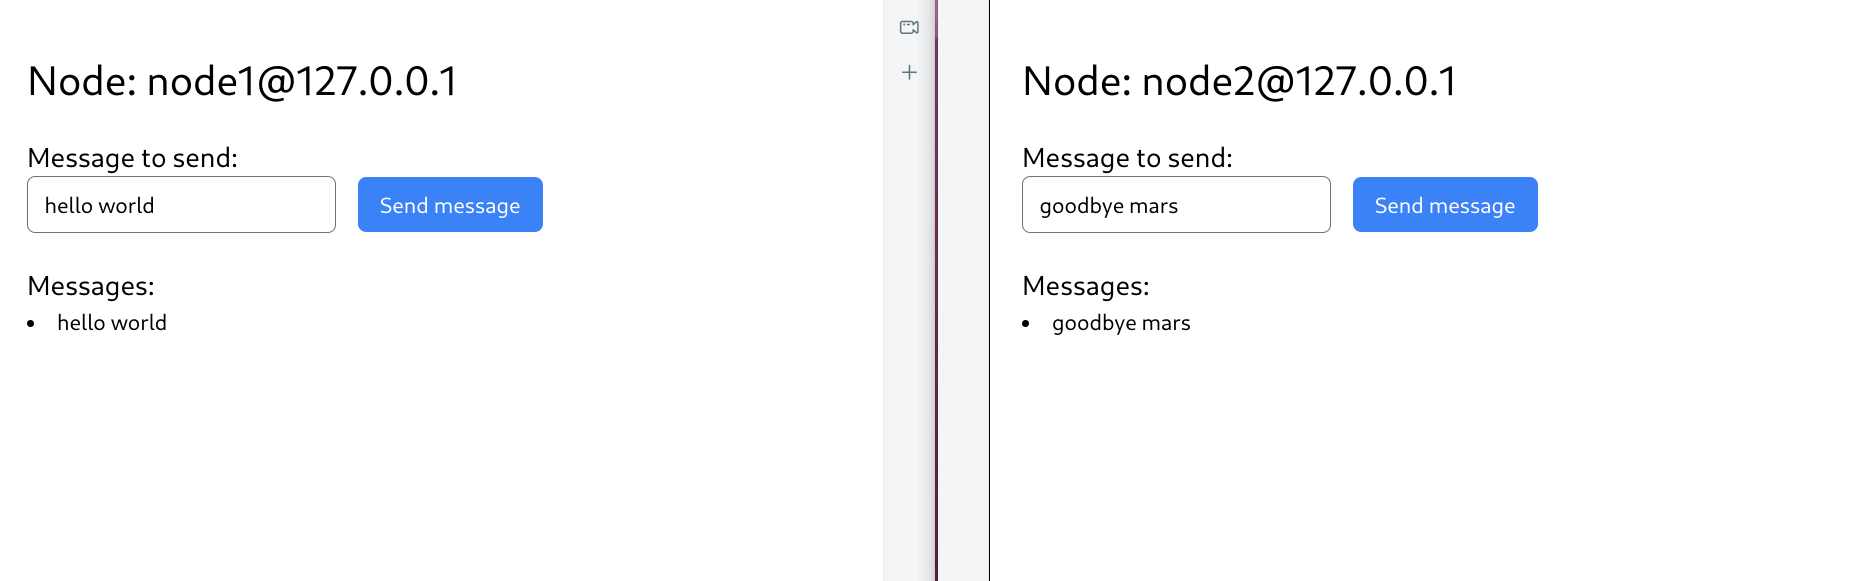
As you can see, the messages we sent did not show up in the other browser window. Let's fix this by using clustering.
To achieve this we will make use of libcluster. The libcluster library "provides a mechanism for automatically forming clusters of Erlang nodes", which is exactly what we need for our application.
To make use of libcluster we need to add it to our list of dependencies:
# mix.exs

defp deps do
  [
    # ...
    {:libcluster, "~> 3.3"}
  ]
end
And don't forget to download it:
$ mix deps.get
Then, add the topology and the supervisor to the supervision tree of the application:
# lib/clump/application.ex

@impl true
def start(_type, _args) do
  topologies = [
    my_topology: [
      strategy: Cluster.Strategy.Epmd,
      config: [hosts: [:"node1@127.0.0.1", :"node2@127.0.0.1"]]
    ]
  ]

  children = [
    # ...
    {Cluster.Supervisor, [topologies, [name: Clump.ClusterSupervisor]]},
    # ...
  ]

  # ...
end
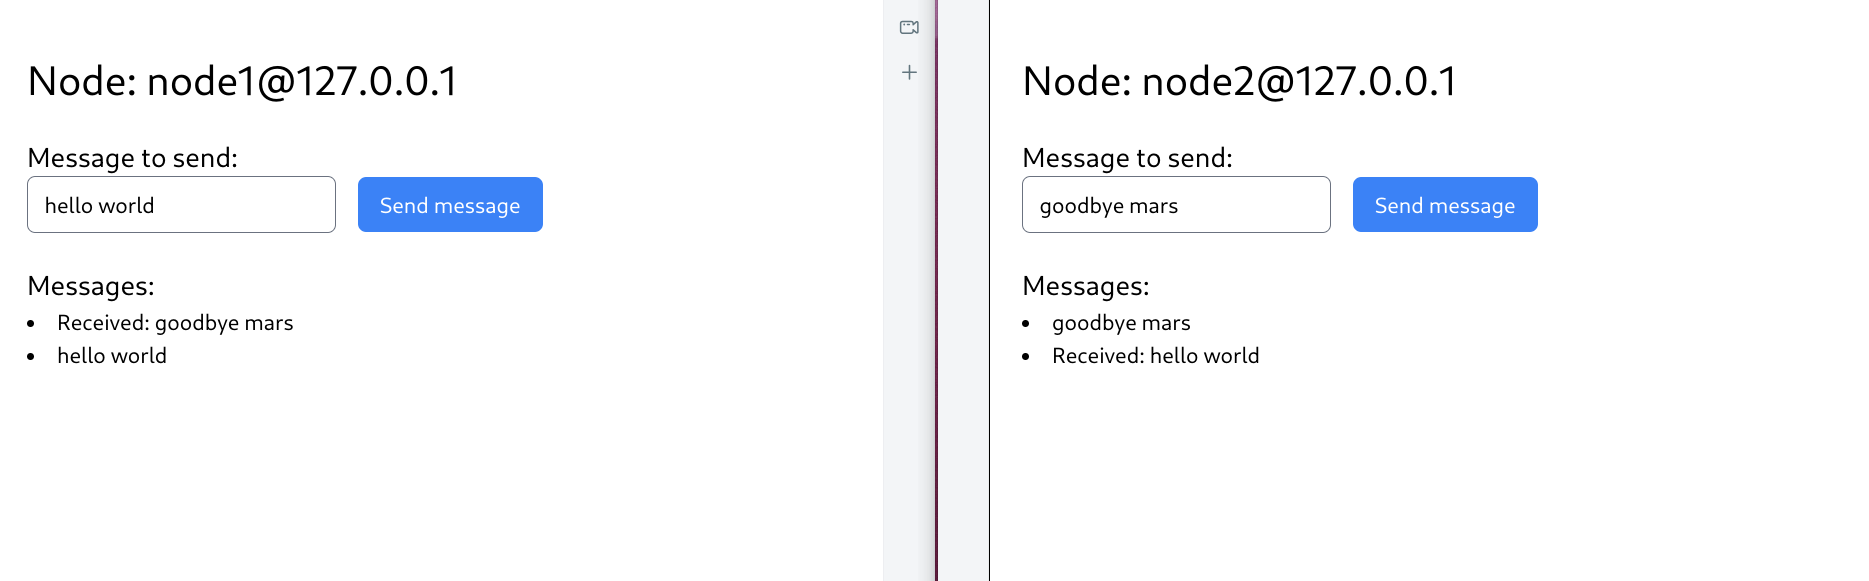
Finally, restart both of the servers. Now when you send a message on a page, all pages will be updated!
Wrapping up
Well done! With just a bit of code we've created a distributed system, all thanks to the technology behind Elixir and Phoenix. Of course, this is only a very simple project, but it highlights the ease at which we can create something that would be very difficult to achieve with other languages.
I hope you've learned something!